Integrate with con terra applications
Overview
service.monitor can be integrated with other con terra products. This is possible due to the same kind of handling and securing of http Requests. Once integration has been accomplished, the following parameters will be logged on client access:
-
basic HTTP request parameters (URL, protocol)
-
basic HTTP response parameters (request duration, HTTP status code)
-
User Agent
-
authentication information
-
client IP
Procedure
-
Follow configurations for map.apps client integration
-
Integration of map.apps and security.manager Enterprise Edition (Server) (see below)
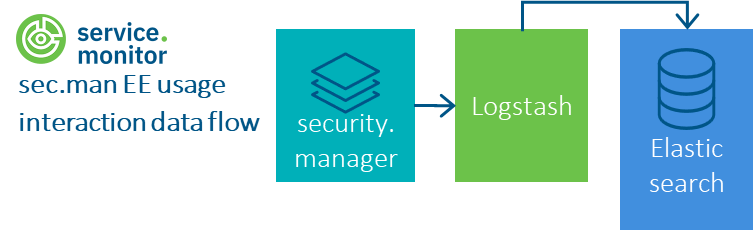
Overview of integrating map.apps and security.manager Enterprise Edition
| Version | Comment |
|---|---|
< 4.15 |
|
4.15 - 4.18 |
|
from 4.19 |
|
| Version | Comment |
|---|---|
from 4.7 |
Procedure as described below |
- INFO
-
With version 4.6.0 of service.monitor, the file ct-analytics-usagelog-api-<version>.jar has been renamed and is now called ct-monitor-analytics-message-extender-<version>.jar. Please note this in future security.manager versions.
Integrate with con terra security.manager Enterprise Edition
In order to log information about requests in your security.manager installation, you need to install the shipped GelfWebSecurityProcessor. This processor usually logs via UDP protocol, TCP protocol is also possible.
Steps for installation and configuration (since version 4.19)
Since this version, the necessary libraries are delivered directly with the wss web application and only have to be defined/overwritten via the application.properties. Only step 1 is necessary for this. Manual integration of the administration web application is done in the following steps.
-
The concrete definition of the connection parameters takes place in
[SECURITY_MANAGER_DATA_FOLDER]/application.propertiesanalytics.enabled=true analytics.gelf.host=myserver.domain.de analytics.gelf.port=12201 analytics.gelf.protocol=udp analytics.gelf.identifier=security.manager -
administration webapp only:
-
Copy the following files from
[security.manager]/webapps/wss/WEB-INF/libto[security.manager]/webapps/administration/WEB-INF/lib-
ct-monitor-analytics-message-extender-<version>.jar
-
gelfclient-<version>.jar
-
netty-all-<version>.Final.jar
-
-
Manually customising the [security.manager]/webapps/administration/WEB-INF/classes/spring-filter-config.xml:
-
Adding the bean reference
<ref bean="monitorAnalyticsFilter"/>after<ref bean="webSecurityFilter"/>(~ line 50) -
Inserting the snippet below before the closing Beans element at the end of the file
<bean id="monitorAnalyticsFilter" factory-bean="monitorAnalyticsFilterFactory" factory-method="create"/>
<bean id="monitorAnalyticsFilterFactory" class="de.conterra.usagelog.support.SecmanEEMonitorFilterFactory" destroy-method="close"
	  p:enabled="${analytics.enabled}"
	  p:identifier="${analytics.gelf.identifier}"
	  p:gelfHost="${analytics.gelf.host}"
	  p:gelfPort="${analytics.gelf.port}"
	  p:gelfProtocol="${analytics.gelf.protocol}"
/>
-
-
-
Der Servlet-Container muss nach erfolgter Änderung neu gestartet werden.
Steps for installation and configuration (before version 4.19)
-
Copy the *.jar files located in
/resources/analytics/webapp-integration/lib-
to
[security.manager]/webapps/wss/WEB-INF/lib -
to
[security.manager]/webapps/administration/WEB-INF/lib
-
-
File
/resources/analytics/webapp-integration/security.manager-<version>/spring-filter-config-administration.xml:-
to
[security.manager]/webapps/administration/WEB-INF/classes/spring-filter-config.xml
-
-
File
/resources/analytics/webapp-integration/security.manager-<version>/spring-filter-config-wss.xml:-
to
[security.manager]/webapps/wss/WEB-INF/classes/spring-filter-config.xml
-
-
Configuration of parameters is done in
[SECURITY_MANAGER_DATA_FOLDER]/application.propertiesanalytics.gelf.server=myserver.domain.de analytics.gelf.port=12201 analytics.message.src=security.manager analytics.log.enabled=true -
Please restart your Servlet Container after applying changes.
map.apps
To collect information about requests to map.apps, the GelfWebSecurityFilter associated with the installation must be activated. The processor usually sends its data via UDP protocol to the Logstash pipeline, alternatively TCP dispatch is possible.
Proceed as follows for installation and configuration:
-
Copy the following files:
-
the JAR files from
/resources/analytics/webapp-integration/lib
to[map.apps]/WEB-INF/liband -
the file
/resources/analytics/webapp-integration/map.apps-<version>/spring-filter-config.xml
to[map.apps]/WEB-INF/classes/spring-filter-config.xml.
-
-
The concrete definition of the connection parameters takes place in
[MAP_APPS_DATA_FOLDER]/application.properties.analytics.gelf.server=myserver.domain.de analytics.gelf.port=12201 analytics.message.src=map.apps analytics.log.enabled=true -
The servlet container must be restarted after the change has been made.
Integrate with other con terra products
A lot of other con terra products support service.monitor integration as shown above. Please ask for Support Plus or Consultancy Services for additional Support.
Logging parameters
useragent-
Information about the user’s OS and browser.
Example:
`"user_agent": "Mozilla/5.0 (Windows NT 6.1; WOW64; rv:41.0) Gecko/20100101 Firefox/41.0"` client_ip-
Anonymized client IP.
Example:
"client_ip": "123.12.12.000" request-
Request parameter information.
Example:
"request": { "server_host": "test.remote.host.com", "url_query": "?queryProperty=testvalue", "server_context: "/wss", "referrer": "http://www.mytest.de", "protocol": "https" } auth-
Authentication information.
Example:
"auth": { "authenticated": true, "user_id": "userA", "login_time": "2011-17-10 11:17:50", "group_name": "sampleGroup", "roles": [ "admin", "editor" ] } response-
Response parameter information.
Example:
"response": { "status": 200 } response_time-
Response time in nanoseconds and response time in milliseconds.
Example:
"response_time": 12345678,
"response_time_ms": 1234.5678