Field restriction
In this tutorial, you will learn how to restrict the access to a subset of fields for features. You will hide the fields population rank and population class for the Cities (0) layer.
This tutorial was tested for ArcGIS Enterprise 11.5 in December, 2025.
Prerequisites
Check the preconditions for this tutorial:
-
security.manager NEXT is installed.
-
You have access to two user accounts:
-
An administrative user account to administer security.manager and Portal.
-
A non-administrative user account to test the access.
-
-
You can use the service SampleWorldCities for this tutorial, so you can restrict access to the service.
This tutorial is based on the Spatial restriction tutorial, in which you allowed authenticated users to access cities within the US with a minimum population of 1,000,000 in the Cities (0) layer of the SampleWorldCities service. The service is shared with the organization. If you are already familiar with these steps, you can complete this tutorial independently; however, keep in mind that your policy file might look different.
Add a field restriction
To restrict the fields, you need the correct field names. After that, add a field restriction template first and then adjust it. You can add templates by pressing Ctrl+Space. This function display available examples, descriptions and code snippets.s.
Get the field names
Find out the correct names of the fields that should be restricted.
-
Open the service metadata.
-
Click on the layer Cities to open the layer metadata.
-
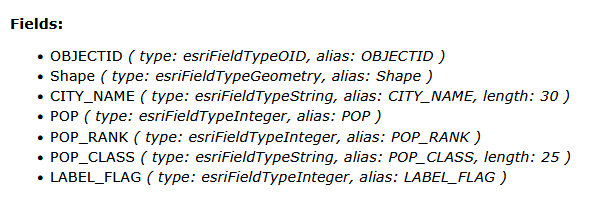
Go to the Fields section.
-
Search for the fields showing the population class and population rank:
-
population class → POP_CLASS
-
population rank → POP_RANK
-
Now you know the correct spelling for the fields and can add a field restriction to the policies of the previous tutorial.
Add a template
Add a field restriction template to the existing policy.
-
Open the permissions editor in the security.manager NEXT Manager UI.
You should now see the permission created in the previous tutorial.
{ "restrictions": { "population":{ "type": "feature", "query": "pop >= 1000000" }, "USA":{ "type": "spatial", "featuretypeurl": "https://services.conterra.de/server/rest/services/security_demos/World_Countries/FeatureServer/0", "featurequery": "NAME = 'United States'", "imageoperation": "arcgis-clipping" } }, "policies": [{ "layers": [ "0" ], "roles": ["enhancedSecurity_authenticated"], "restrictions": ["population", "USA"] }] } -
Add a comma and a new line after the curly brace at the end of the
USArestriction. -
Enter
"reduced_fields":to create a new restriction called reduced_fields. -
After entering the colon, you should get a list of restriction types displayed, select Field restriction.
If no list is displayed use Ctrl+Space to open it manually.
Now you have created a skeleton for a field restriction.
{
    "restrictions": {
        "population":{
            "type": "feature",
            "query": "pop >= 1000000"
        },
        "USA":{
            "type": "spatial",
            "featuretypeurl": "https://services.conterra.de/server/rest/services/security_demos/World_Countries/FeatureServer/0",
            "featurequery": "NAME = 'United States'",
            "imageoperation": "arcgis-clipping"
        },
        "reduced_fields":{ (1)
            "type": "field", (2)
            "hiddenfields": [ (3)
                "field_name" (4)
            ]
        }
    },
    "policies": [{
        "layers": [
            "0"
        ],
        "roles": ["enhancedSecurity_authenticated"],
        "restrictions": ["population", "USA"]
    }]
}| 1 | The restriction is called reduced_fields. |
| 2 | The type of the restriction is field. |
| 3 | The hiddenfields element enumerates the names of the fields that should be hidden. |
| 4 | A placeholder of a field name to be hidden. |
Adjust the restriction
Now adjust the template to hide the fields POP_CLASS and POP_RANK.
-
Configure the field restriction:
-
Replace the placeholder with
"POP_CLASS". -
Add a comma, a newline and enter
"POP_RANK".
-
-
Add
"reduced_fields"separated by a comma to therestrictionsof the policy.The policy with a feature, a spatial and a field restriction should now look like this:
{ "restrictions": { "population":{ "type": "feature", "query": "pop >= 1000000" }, "USA":{ "type": "spatial", "featuretypeurl": "https://services.conterra.de/server/rest/services/security_demos/World_Countries/FeatureServer/0", "featurequery": "NAME = 'United States'", "imageoperation": "arcgis-clipping" }, "reduced_fields":{ "type": "field", "hiddenfields": [ "POP_CLASS", "POP_RANK" ] } }, "policies": [{ "layers": [ "0" ], "roles": ["enhancedSecurity_authenticated"], "restrictions": ["population", "USA", "reduced_fields"] }] } -
Click Save changes and restart.
The policy is now extended by a restriction that hides the fields POP_CLASS and POP_RANK. Authenticated users can now access features of the Cities (0) layer that have a population of at least 1 million and are located in the US, but they cannot access both hidden fields.
Verify configuration
To verify the previous configuration go back to the layer metadata and check if the fields are not available anymore.
-
Open the service metadata.
-
Click on the layer Cities to open the layer metadata.
-
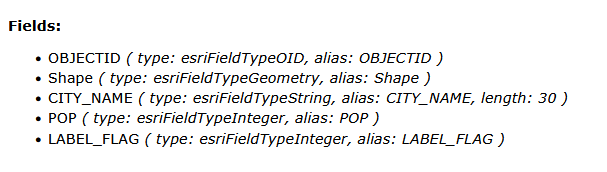
Go to the Fields section.
-
You can see in that section that all fields except POP_CLASS and POP_RANK are listed.
Summary
In this tutorial, you learned how to restrict access to the fields of a layer. You added a restriction to allow authenticated users access to all fields except the fields POP_CLASS and POP_RANK.
For further details, refer to Field restriction in the reference.
You have now completed all tutorials on basic restrictions and learned how to create a policy with all restriction types for the predefined group enhancedSecurity_authenticated. In the Working with groups tutorial, you will learn how to use ArcGIS Portal groups instead of the predefined group for all authenticated users.