Configuration
Add editing functions to an app
| The delivery includes a sample app that shows how to use the editing features. |
To add editing capabilities to an app, add the advanced-editing bundle to your app. Additionally, add the map layers that should be editable with map.apps Advanced Editing.
Add editable map layers to the app
Add the layers that are to be used for editing to the app. Details on this are described in the map.apps documentation on the page map content.
The following example shows the possible configurations that can be made to a layer. Details are described in the following table.
{
    "id": "mylayer",
    "type": "AGS_FEATURE",
    "url": ".../FeatureServer/0",
    "editingEnabled": true,
    "advancedEditing": {
        "allowSnapping": true,
        "allowGeometryEditing": true,
        "allowAttributeEditing": true,
        "allowAttachmentEditing": true,
        "allowAdd": true,
        "allowDelete": false,
        "allowUpdate": true
    }
}| Name | Beschreibung |
|---|---|
|
To use an editable layer in the app but not offer it for editing, set the |
|
|
|
By default, all layers on which snapping is possible are used for snapping.
To exclude a layer from snapping, set the |
|
Determines whether the Geometry tab is displayed. |
|
Determines whether the Attributes tab is displayed. |
|
Determines whether the Attachments tab is displayed. |
|
Defines whether new objects can be created in this layer. This setting only applies if |
|
Determines whether existing objects in this layer can be edited. This setting only applies if |
|
Determines whether existing objects can be deleted from this layer. This setting only applies if |
The configuration of allowAdd, allowUpdate and allowDelete hides UI elements.
This does not secure the layer on the server side.
This means that the defined restrictions could be circumvented by malicious access via the layers REST interface.
|
| The client-side restrictions listed here can only be used effectively if the respective operation on the layer is allowed on the server side. A server-side restriction of the layer cannot be overridden by the configurations listed here. |
Editing actions with editing tools (map.apps Tools)
For starting an editing session, map.apps Advanced Editing offers three basic tools. Add the desired tools to a toolset in your app:
| Feature | Tool ID |
|---|---|
Create new object |
|
Edit object |
|
Objekte zusammenführen |
|
General hints on configuring tools are described in the Tools section of the map.apps documentation.
Edit action in popups
In addition to the editing tools described above, editing can also be started via a tool in a popup.
To do this, add the property "customActions": ["advanced-editing-edit-object"] in the configuration of the respective map layer as in the following example:
{
    "map-init": {
        "Config": {
            "basemaps": [],
            "map": {
                "layers": [
                    {
                        "id": "status",
                        "url": "https://www.example.com/arcgis/rest/services/mapapps/stoerung/FeatureServer/1",
                        "type": "AGS_FEATURE",
                        "popupTemplate": {
                            "customActions": [
                                "advanced-editing-edit-object"
                            ]
                        }
                    }
                ]
            }
        }
    }
}
Editing actions in the Result Center
You can use the Result Center in combination with map.apps Advanced Editing to show the objects of a layer in a table. From here, you can start an editing session for a certain object or delete multiple objects at once.
Add the result-ui bundle to your app to use the Result Center.
Edit a single object
For objects on editable layers, an editing session can be started from the Result Center. Click the button with the three dots in the row of the object to be edited and click Edit.
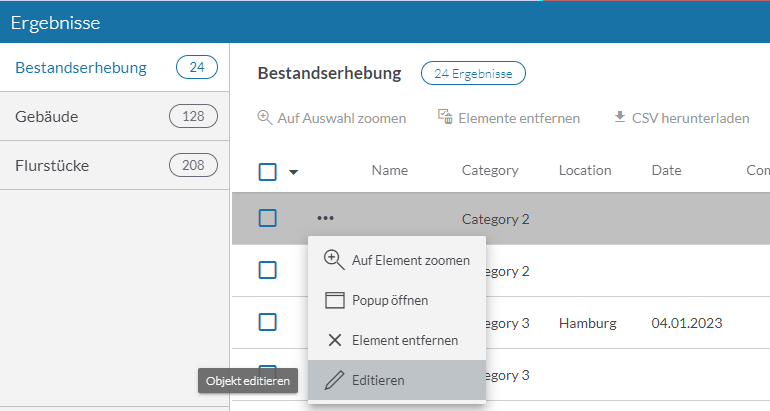
The Result Center is minimized as soon as editing is started via a row action.
Delete multiple objects at once
To delete multiple objects at once, proceed as follows:
1. Select the area in the map where the objects to be deleted are located. For this, use the spatial selection tool of map.apps (selection-ui bundle). The Result Center opens.
2. Select the objects to be deleted in the Result Center. To do this, click the checkboxes in front of the objects.
3. Click the Delete objects button.
Editing in the Esri Feature Table
The Esri Feature Table is a powerful tool for managing and editing objects in a tabular view. It is especially useful for efficiently handling large datasets and performing bulk operations. The Feature Table offers the following key functions:
-
Display all objects of a layer in a table
-
Edit attribute values directly in the table (inline editing)
-
Delete single or multiple objects at once
-
Show, add, and manage attachments
-
Show, add, and manage related records
-
Sort objects by attributes
-
Adjust table columns (show/hide, reorder)
-
Export objects to CSV format
| The Esri Feature Table is fully integrated with map.apps Advanced Editing and respects the editing permissions and configuration of your layers. |
How to add the Esri Feature Table to your app
-
Add the bundle
advanced-editing-feature-tableto your app configuration. -
Ensure that the layers you want to edit are configured as editable (see Add editable map layers to the app).
How to open the Esri Feature Table
-
Click the Map Content button (map.apps TOC) in your app.
-
Next to the desired layer, click the button with the three dots (⋮).
-
Select Feature table from the menu. The Esri Feature Table will open for that layer.
-
Select at least one row of the Result Center table.
-
Click the Edit features tool. The selected features are now opened in the feature table.
Configuration and best practices
-
For advanced configuration options, refer to the README.md file of the advanced-editing-feature-table bundle.
-
If you are using map.apps Advanced Editing in a map.apps environment prior to 4.19.3, you must update your Content Security Policy to allow inlined web fonts. Otherwise, some icons in the Feature Table may not display correctly. Add the following directive to your
security.responseHeaders.appsproperty:
security.responseHeaders.apps=Referrer-Policy:strict-origin-when-cross-origin,Content-Security-Policy: default-src 'self'; script-src 'self' 'unsafe-eval' https: http:; worker-src 'self' blob:; child-src 'self' blob:; connect-src 'self' https: http: wss: ws:; frame-src 'self' https: http:; img-src 'self' data: blob: https: http:; style-src 'self' 'unsafe-inline'; base-uri 'self'; font-src 'self' data:; form-action 'self'Adjusting the editing user interfaces
When editing an object with map.apps Advanced Editing, a dialog opens in which the geometry, attributes and attachments of the object can be edited. You can specify whether the tabs for Geometry, Attributes and Attachments are displayed in the editing dialog. The following parameters are available for configuration:
| Name | Description |
|---|---|
|
Determines whether the Geometry tab is displayed. |
|
Determines whether the Attributes tab is displayed. |
|
Determines whether the Attachments tab is displayed. |
The following example shows the configuration with the default values. In this example, all three tabs are displayed for all map layers.
{
    "advanced-editing": {
        "Config": {
            "allowGeometryEditing": true,
            "allowAttributeEditing": true,
            "allowAttachmentEditing": true
        }
    }
}| To specify for individual layers whether the editing of geometry, attributes and attachments is displayed, see Map layers. |
Customize geometry editing dialog for single layers
It is not only possible to set globally whether the tabs for geometry, attributes and attachments are displayed. You can do this for individual layers as well. For details please see the section Add editable map layers to the app.
Customize geometry editing dialog
The following parameters are available for configuration:
| Name | Description |
|---|---|
|
Determines whether the tools for drawing temporary helper geometries are displayed. |
|
Determines whether the construction support control is displayed. |
The following example shows the configuration with the default values:
{
    "advanced-editing": {
        "Config": {
            "showSketching": true,
            "showSnappingControls": true
        }
    }
}
Customize attribute editing dialog
To customize the input forms for attribute editing, so called FormTemplates can be used, which are defined at the respective feature layer. This allows a selection of displayed attributes, their order and grouping to be specified.
The following example shows the definition of a FormTemplate:
{
    "map-init": {
        "Config": {
            "basemaps": [],
            "map": {
                "layers": [
                    {
                        "id": "status",
                        "url": "https://www.example.com/arcgis/rest/services/mapapps/stoerung/FeatureServer/1",
                        "type": "AGS_FEATURE",
                        "title": "Layer with custom formTemplate",
                        "formTemplate": {
                            "title": "Bürger melden Störungen",
                            "description": "Helfen Sie dabei, unsere Stadt schön zu halten!",
                            "elements": [
                                {
                                    "type": "group",
                                    "label": "Art der Störung",
                                    "description": "Im ersten Schritt, geben Sie bitte die Art der Störung ein.",
                                    "elements": [
                                        {
                                            "type": "field",
                                            "fieldName": "art",
                                            "label": "Was möchten Sie melden?"
                                        }
                                    ]
                                },
                                {
                                    "type": "group",
                                    "label": "Details zur Erfassung",
                                    "description": "Geben Sie in diesem Schritt optional weitere Informationen ein.",
                                    "elements": [
                                        {
                                            "type": "field",
                                            "fieldName": "details",
                                            "label": "Details zur Meldung"
                                        },
                                        {
                                            "type": "field",
                                            "fieldName": "zeitpunkt",
                                            "label": "Zeitpunkt der Meldung"
                                        }
                                    ]
                                }
                            ]
                        }
                    }
                ]
            }
        }
    }
}
Behavior while editing
Prevent objects from being moved
To disable the ability to move objects as a whole, set the following configuration:
{
    "advanced-editing": {
        "Config": {
            "allowMovingObject": true
        }
    }
}
It is still possible to move individual vertices.
Snapping
Allow snapping on base maps
To enable snapping on base maps, set the following configuration:
{
    "advanced-editing": {
        "Config": {
            "allowBasemapSnapping": true
        }
    }
}
Snapping tolerance
To change the minimal distance from a geometry for snapping, set the following configuration (6 pixels is the default value):
{
    "advanced-editing": {
        "Config": {
            "snappingDistance": 6
        }
    }
}
Disable right angles and parallel lines snapping
When drawing lines or areas, right angles and parallel lines to previously drawn segments are displayed and snapped by default. To prevent this, set the following configuration:
{
    "advanced-editing": {
        "Config": {
            "selfSnappingEnabled": false
        }
    }
}| For more information about configuration, see the bundle documentation . |