Job-Manager
To get results from the search, you must first create an indexing job. This is done using the The Job Manager.
This is available after a user with administrative rights has successfully logged on (default user: admin/admin).
After successful logon, you can open the Job Manager in two ways:
-
by entering the context
/smartfinder/managerin the address line of the browser, or -
by clicking on the Job Manager tool in the user interface.
Administration of indexing jobs
After successful login or call you will see the following interface:
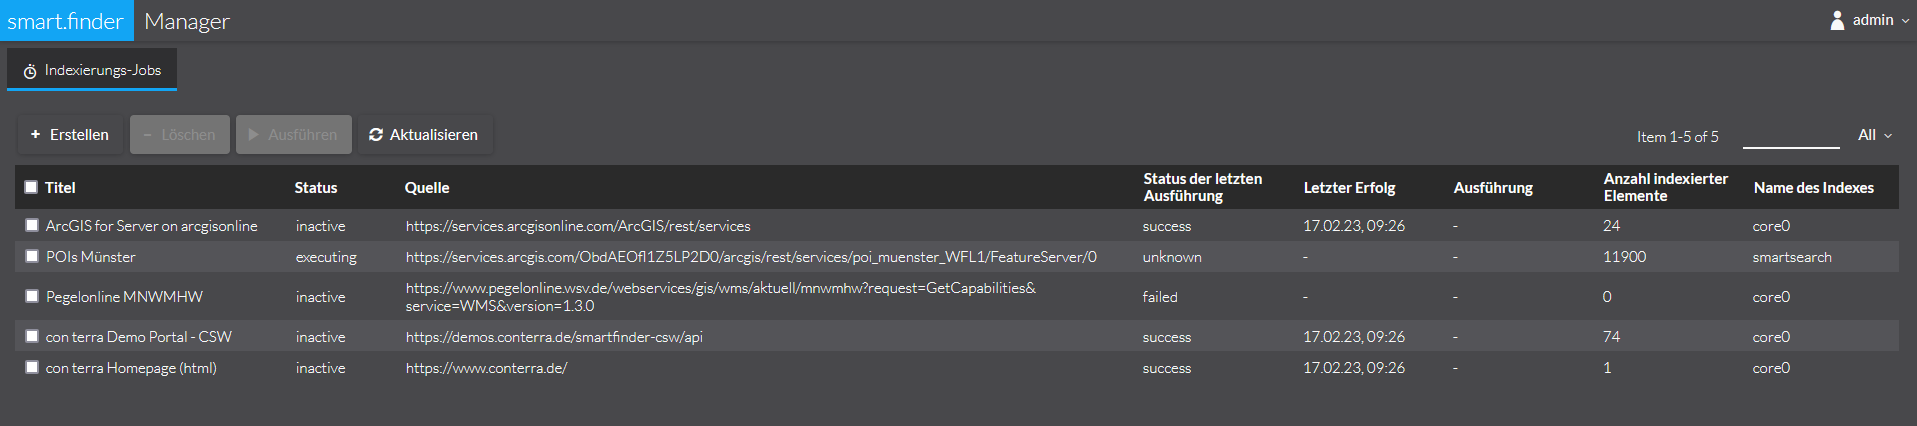
All published jobs are listed here. These are described as follows:
| Parameter | Explanation |
|---|---|
Title |
The title of the job |
Status |
The current status of the indexing. The following statuses are possible:
|
Source |
The source indexed by this job |
status of last execution |
successful or failed |
Last Success |
Date of the last successful indexing. |
Execution |
If a scheduling is configured, the next execution time is displayed here. |
Number of Indexed Items |
Number of documents that were included in the index during the last successfully performed indexing. |
Name of the index |
Name of the Solr Collection in which the data is indexed, see Cores and Indexes |
| Since the indexing of the jobs is done asynchronously, the number of indexed documents for a job is displayed with a delay. |
Create indexing jobs
To create a new job, click on the + symbol in the upper left corner. A selection dialog box appears where you can choose the source to be indexed.
General information
Each source requires a number of parameters. Some are specific, others are general to each source.
The general parameters are:
| Parameter | Explanation |
|---|---|
Title |
The title of the job |
Send Status Message to |
comma-separated list of email addresses to which status changes are sent |
Name of Index |
The name of the index to which the resources of the source are to be indexed.
If no value is selected, the default index is used, which is defined by the property |
Scheduling |
Repeats the execution of the job at specified intervals. See Scheduling Indexing Jobs |
The following sections explain the specific parameters for each source.
Indexing source URL
Select this type if you want to index resources that are addressable via a URL. Examples are resources that are located on a Web page or GetCapabilities Request.
| Parameter | Explanation |
|---|---|
URL |
URL of the source |
Filter |
For Web Site Crawling only: regular expression to define link following. |
Search Depth |
For Web Site Crawling only: Specifies the maximum search depth within the page hierarchy. |
.pdfURL: https://www.conterra.de/dir Filter: .*(\.(pdf))$ Search depth: 2
Results:
https://www.conterra.de/dir/doc.pdf is indexed
https://www.conterra.de/dir/1/doc2.pdf is indexed
https://www.conterra.de/dir/1/doc3.xdoc is not indexed
https://www.conterra.de/dir/1/2/doc3.pdf is not indexed
Titel: WMS Demo Portal con terra
URL: http://services.conterra.de/geoserver/wms?Request=GetCapabilities&Service=WMS
Result: The Capabilities XML of the URL is indexed.
Indexing via Data Import Handler
Many applications store its content in a structured data store, such as a relational database. The Data Import Handler (DIH) is a feature of Apache Solr and provides a mechanism for indexing these contents.
| The smart.finder allows the configuration file of a Data Import Handler to be read and included in the Job Manager. The configuration for a specific data source can be found in the Apache Solr documentation |
Data Import Handler configurations are always created for a specific index. The following conventions apply in smart.finder:
-
Configuration files must be located in the
/confdirectory of the relevant index. -
By convention, its name begins with
dih-and ends with.xml
Under core0/conf/dih-sample.xml you will find the sample configuration of a Data Import Handler This shows the indexing of an ATOM feed.
|
To include a configuration file in the Job Manager, select the Data Import option. The following specific parameters can be specified:
| Parameter | Explanation |
|---|---|
Configuration File |
The |
type of import |
|
| A delta import can only be performed with a database as data source. |
Indexing Source OGC CSW Catalog
To index ISO metadata accessible via an OGC CSW 2.0.2 interface, select the OGC CSW Catalog option. Specify the following values:
| Parameter | Explanation |
|---|---|
URL |
HTTP POST Endpoint of the catalog GetRecords interface |
Index Distributed Catalogs |
Click this option if you want to additionally index the ISO metadata accessible through the above catalog in a distributed search. |
Search Depth |
Only relevant if the option Index Distributed Catalogs is activated and defines the search depth for the distributed catalogs (the so-called hopCount). |
OGC CSW CatalogIf you want to index the catalog in the Demo Portal of con terra, enter the following values:
Title: CSW Demo Portal con terra URL: http://services.conterra.de/soapServices/CSWStartup
Index Distributed Catalogues: Yes
Search depth: 2
The job thus defined indexes the CSW catalog and all connected catalogs up to a search depth of 2.
Indexing source directory
To index resources that exist in a local directory, select the directory option. Specify the following values:
| Parameter | Explanation |
|---|---|
Directory |
The base directory to be searched. |
directory depth |
|
File Types |
An optional filter to restrict the files to be indexed. This is described using the glob pattern, see: What Is a Glob? . Examples:
|
Example Indexing Directory
The following directory structure is given:
C:\data\1.pdf
C:\data\1.doc
C:\data\sub\1.xml
C:\data\sub\2.pdf
C:\data\sub\subsub\1.tiff
For example, if you want to index all XML files in the root directory and one level lower, enter the following values:
Title: Verzeichnis 'data'
Directory: C:\data
Directory depth: Direkt
File types: *.xml
If you want to index all PDF and Tiff files, enter the following values:
Title: Verzeichnis 'data'
Directory: C:\data Vezeichnistiefe:
File types: *.{pdf,tiff}
Schedule indexing jobs
In addition to starting jobs manually, you have the option of repeating them at specific times and having them run automatically. To do this, you can explicitly define a scheduling for each job. To do this, activate the Scheduling option when creating a job. You can also define a scheduling for a job later.
- When?
-
A predefined list of values that cover specific time periods.
These are:
-
Every full hour (i.e. hourly)
-
Every day at 00:00 (i.e. daily)
-
Every Sunday at 00:00 (i.e. weekly)
-
Every 1st day of the month at 00:00 (i.e. monthly)
-
- Cron Job
-
Here the temporal pattern is entered in the cron notation.
- Status
-
Here you define whether the scheduling should be activated (scheduled) or paused (inactive).
| The predefined notations cover a wide range of applications. Should you still prefer to schedule the job yourself, you can set the setting to User Defined and define your own cron job. The explanation can be found documented in the Quartz framework, which is used on the server side: Quartz Cron Trigger Tutorial |
If a scheduling is defined for an indexing job, the following statuses result from this:
| Status | Meaning |
|---|---|
|
This is the normal state: the job is in the queue and it continuously checks whether the interval specified by the Scheduler has been reached. |
|
The interval specified by the scheduler is currently reached. The job is waiting for a free space in the execution chain. |
|
indexing of the job is running. After successful indexing, the scheduled state is set for the job again. |
|
A scheduling is defined for the indexing job, but is currently paused. |