ArcGIS Enterprise portal
map.apps is able to delegate the authentication of users to the ArcGIS Enterprise portal using the OAuth 2.0 protocol. This means that a user can log in to map.apps with an portal account. Groups and roles of the portal user are translated into roles for map.apps.
Connecting to ArcGIS Enterprise portal creates the following possibilities:
-
Assignment of roles for the use of map.apps Manager
-
Protection of apps
-
Protection of tools
-
Use of non-public content such as webmaps or layers without re-registration (single sign-on)
Connecting to ArcGIS Enterprise portal has the following limitations:
-
Apps exported with the app export for native apps do not support the authentication. Apps with anonymous access are still supported.
Create connection between map.apps and ArcGIS Enterprise Portal
Connecting map.apps with ArcGIS Enterprise portal is done in three steps:
-
First, you register map.apps as a trusted app in ArcGIS Enterprise portal.
-
Then, you adjust the configuration of map.apps so that map.apps can delegate the authentication to ArcGIS Enterprise portal.
-
Finally, you configure your apps to use the authentication information.
Step 1: Register map.apps at ArcGIS Enterprise portal
| The following configuration steps refer to ArcGIS Enterprise portal 10.9.1. In previous versions, the dialogs may slightly differ. |
map.apps must be registered as an application at the portal in order to use the portal’s single sign-on. To do this, perform the following steps:
-
Log in to portal as a privileged user.
-
Switch to tab Content.
-
Click New item and in the subsequent dialog click Application.
-
A dialog for creating the new element is displayed. Use the following settings there:
-
Type:
Web Mapping. -
URL: URL of the map.apps installation, for example
https://example.com/mapapps
-
-
Click Next.
-
Now set the other properties of the element as follows:
-
Title:
map.apps -
Folder: Select the folder where you want to save the item.
-
Tags:
map.apps -
Summary (optional): You can create a summary for the element, for example:
Registration of map.apps
-
-
Click Save. The overview of the newly created element is displayed.
-
Set additional registration properties by proceeding as follows:
-
In the app overview click Settings and go to section Web Mapping Application.
-
Click Register.
-
Specify the URL of your map.apps installation as the Redirect URI, e.g.
https://example.com/mapapps. -
Click Add to add the URI to the list of valid redirect URIs.
-
Click Register to close the dialog.
-
-
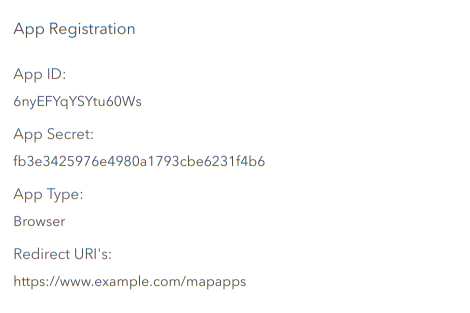
After you have successfully registered the application, its registration data will be displayed, which you will need for the subsequent configuration of map.apps:
-
Store the displayed App ID somewhere.
-
Click Show secret and store the displayed App Secret.
-
The registration is now complete and you can proceed with the configuration of map.apps.
URLs should start with https:// to ensure that secret tokens are always sent over a secure channel.
|
Step 2: Configure map.apps
The following parameters must be added or changed in the map.apps Configuration.
security.mode=OAUTH
esri.api.arcgisPortalUrl=https://arcgis.example.com/portal
security.oauth.clientId=6nyEFYqYSYtu60Ws
security.oauth.clientSecret=fb3e3425976e4980a1793cbe6231f4b6
# Replace "0123456789" with an arbitrary string of at least 32 characters
security.sharedSecret=0123456789security.mode-
The value
OAUTHspecifies that the authentication is delegated to ArcGIS Enterprise portal using the OAuth 2.0 protocol. esri.api.arcgisPortalUrl-
URL of the ArcGIS Enterprise portal used for authentication.
security.oauth.clientId-
App ID that has been created when map.apps has been registered as an application at the ArcGIS Enterprise portal.
security.oauth.clientSecret-
App Secret that has been created when map.apps has been registered as an application at the ArcGIS Enterprise portal.
security.sharedSecret-
The text you enter here will be used by map.apps as a key for encrypting data that needs to be exchanged between different parts of the application. To prevent unauthorized access or manipulation of data you should keep this secret private, like a password. You must create this key yourself. It must have a length of at least 32 characters for security reasons.
You can create a secure key with these commands, for example:
Windows PowerShell> [Convert]::ToBase64String((1..32|%{[byte](Get-Random -Minimum ([byte]::MinValue) -Maximum ([byte]::MaxValue))}))Linux$ openssl rand -base64 32In a scenario where, for example, multiple application instances are used for load balancing, all instances must use the same value.
Configuration for federated ArcGIS Servers
In certain scenarios, described below, you must also configure the security.oauth.tokenRules parameter.
This parameter defines the rules how map.apps sends access tokens to secured services.
If your ArcGIS Enterprise portal is federated with an ArcGIS Server whose URL differs from the default https://arcgis.example.com/arcgis, enter an entry in the following form:
security.oauth.tokenRules=https://arcgis.example.com/otherserver,TOKENIf your ArcGIS Enterprise portal is federated with multiple ArcGIS Servers, all those server URLs have to be listed, which differ from the default value https://arcgis.example.com/arcgis:
security.oauth.tokenRules=https://arcgis.example.com/otherserver1,https://arcgis.example.com/otherserver2,TOKENList all these URLs separated by commas and end the entry with the keyword TOKEN.
Step 3: Configure your apps
Finally, register each app in which a login via ArcGIS Enterprise portal should be performed using the Register App in ArcGIS function in map.apps Manager.
This step adds the authentication and portal-app-security bundles to the app and adds necessary entries in the properties section to the app configuration.
Set the sharing settings in the created ArcGIS item in portal to specify who is allowed to access the app.
To use ArcGIS Enterprise portal login without creating an item in portal, just add the bundle authentication to the app without registering the app.
In this case, the app is approved via the settings in map.apps Manager.
Role assignment
map.apps grants access to protected resources depending on roles to which a user is assigned in map.apps. For example, only users assigned to the 'maAdmin' role can access the map.apps Manager. Additionally, you can make the availability of apps or tools dependent on specific roles.
When you configure ArcGIS Enterprise portal to authenticate users, information from the corresponding portal account determines which roles are assigned to the user in map.apps. The list of roles of a user in map.apps is composed of the role and the groups that are assigned to the portal user.
Portal roles
The role to which a user is assigned at ArcGIS Enterprise portal is translated by map.apps as follows:
| Portal role | map.apps role | Description |
|---|---|---|
|
|
Portal administrators become map.apps administrators. |
|
|
Portal publishers become map.apps editors. |
|
|
All other roles are adopted from ArcGIS Enterprise portal without changes. |
Portal groups
The groups a person belongs to in ArcGIS Enterprise portal are also translated into map.apps roles.
Since multiple people can create portal groups with the same title, a group is translated into a map.apps role of the form <title>::<owner>.
| Portal group | map.apps role |
|---|---|
|
|
|
|