Connecting ArcGIS Enterprise portal
Using the OAuth 2.0 protocol, the Identity Service can delegate the authentication of users to ArcGIS Enterprise portal. This means that a user can log in with an ArcGIS Enterprise portal account.
Connecting to ArcGIS Enterprise portal is done in several steps:
First you register the Identity Service as a application in ArcGIS Enterprise portal.
Then you adjust the configuration of the Identity Service so that the login can be delegated to ArcGIS Enterprise portal.
Finally you check the configuration using the Identity Service to log in to ArcGIS Enterprise portal.
| The following description is based on version 11.5 of ArcGIS Enterprise portal. |
Step 1: Register Identity Service in ArcGIS Enterprise portal
The Identity Service must be registered as an application in ArcGIS Enterprise portal to use the single sign-on. To do this, perform the following steps:
-
Login to ArcGIS Enterprise portal.
-
Switch to the Content tab.
-
Click New item and in the subsequent dialog click Application.
-
A dialog for creating the new element is displayed. Use the following settings there:
-
Type:
Web Mapping. -
URL: URL of the Identity Service installation, for example
https://www.example.com/identity
-
-
Click Next.
-
Now set the other properties of the element as follows:
-
Title:
Identity Service -
Folder: Select the folder where you want to save the item.
-
Categories (if available - optional): You can set one or more categories for the element.
-
Tags:
identity -
Summary (optional): You can create a summary for the element, for example:
Registration of Identity Service at ArcGIS Enterprise portal
-
-
Click Save. The overview of the newly created element is displayed.
-
Set additional registration properties by proceeding as follows:
-
In the app overview click Settings and go to section Web Mapping Application.
-
Click Register application.
-
Specify the URL of your Identity Service installation as the Redirect URI, for example
https://www.example.com/identity. -
Click Register to close the dialog.
-
-
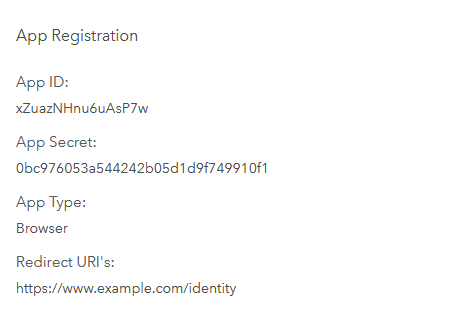
After you have successfully registered the application, its registration data will be displayed, which you will need for the subsequent configuration:
-
Store the displayed Client ID somewhere.
-
Click on the button with the eye icon to display the Client Secret. You need to remember this one as well.
-
The registration is now complete and you can proceed with the configuration of the Identity Service.
URLs should start with https:// to ensure that secret tokens are always sent over a secure channel.
|
Step 2: Configure Identity Service
The following parameters must be added or changed in the global Configuration.
# application.properties
security.oauth.provider=arcgis
security.oauth.provider.arcgis.url=https://www.example.com/portal
security.oauth.tokenRules=https://www.example.com/portal,TOKEN;https://www.example.com/server,TOKEN
## When using IWA the token rules must not contain the portal URL:
# security.oauth.tokenRules=https://www.example.com/server,TOKEN# secrets.properties
security.oauth.clientId=6nyEFYqYSYtu60Ws
security.oauth.clientSecret=fb3e3425976e4980a1793cbe6231f4b6security.oauth.provider-
The value
arcgisdefines ArcGIS Enterprise portal as identity provider. security.oauth.provider.arcgis.url-
URL of your ArcGIS Enterprise portal.
security.oauth.tokenRules-
URLs of ArcGIS Portal and all federated servers, i.e. all federated ArcGIS Servers, with
TOKENas transport type. If ArcGIS Enterprise portal is configured for Integrated Windows Authentication (IWA), the portal URL must not be included in the token rules. See also Configure trusted services. security.oauth.clientId-
App ID that has been created during the registration as an application in ArcGIS Enterprise portal.
security.oauth.clientSecret-
App Secret that has been created during the registration as an application in ArcGIS Enterprise portal.
Additional configuration for IWA
If ArcGIS Enterprise portal is configured to use Integrated Windows Authentication (IWA), you need to make the following additional settings:
security.oauth.provider.arcgis.url.internal=https://gis-portal.example.com:7443/arcgissecurity.oauth.provider.arcgis.url.internal-
The internal URL of the ArcGIS Enterprise portal that does not use IWA.
Step 3: Test configuration
You can test the configuration of ArcGIS Enterprise portal as identity provider by performing a login initiated by the Identity Service. Follow these steps:
-
Make sure you have a portal user account
-
If you are logged in to portal, log out.
-
Open the Identity Service base URL, http://www.example.com/identity or http://www.example.com:8080/identity, for example. Make sure to use the exact same URL that you specified as Redirect URI when registering the Identity Service at ArcGIS Enterprise portal in step 1 of this document.
The browser displays a page with a list of available service endpoints:
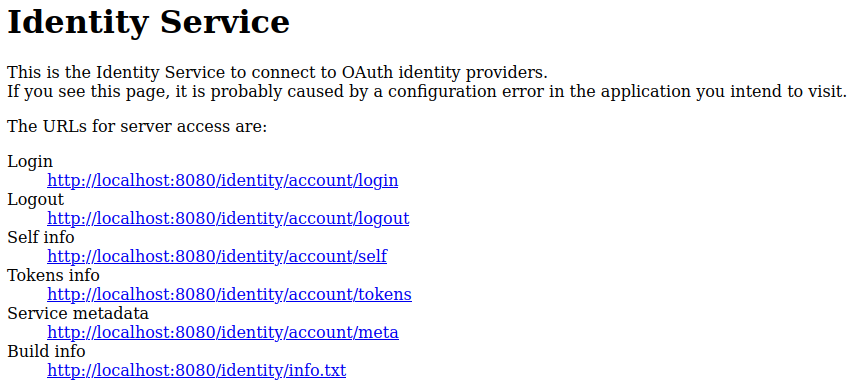
-
Click the link titled Login. The browser will redirect you to the portal login page.
-
Enter username and password of your portal account to login.
After successful login you are redirected to the Identity Service "Self" endpoint (/identity/account/self), where your account information is presented as JSON.
In this case, you have successfully connected ArcGIS Enterprise portal with the Identity Service.
Step 4: Customize role mapping (optional)
When connecting other con terra Technologies products with the Identity Service, you may need to ensure that authenticated users have certain roles to access the product features. Please refer to the respective product documentation to find out which roles are required.
In the article about role mapping, you will find more information about how portal roles and groups are translated into Identity Service roles and how you can customize this if needed.
Next steps
After you have connected ArcGIS Enterprise portal as an identity provider with the Identity Service, you need to configure federated servers as trusted services. Only then can users of applications that use the Identity Service access ArcGIS Server services without further login.